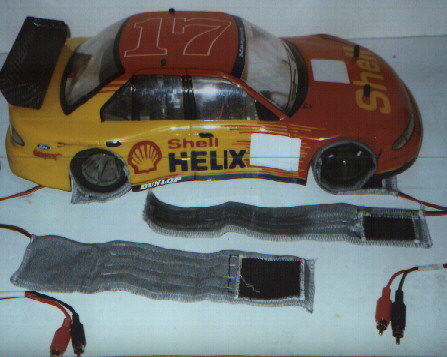


Tire warmers are basically like a set of mini electric blankets for your foam tires, they are great for improving traction on cold nights (especially when there is moisture in the air) as they keep your tyres warm and dry. This makes handling much more consistent as the night goes on and reduces handling problems over the first few laps, especially if you also use sunscreen tosoften the tyres. They are also really good for your wrists and ankles on extremely cold nights!
To make a set of tire warmers you will need:
-About 6 feet of resistance wire (Nichrome, Cuprothal etc)
-About 10 feet of figure-8 DC power cable (5A plus)
-Power Plugs
-Scrap denim
-Velcro
-A sewing machine
The first thing to do is to find the length of resistance wire needed, to do this connect a long length of resistance wire to your 12v power source slowly reduce the length of wire until it becomes warm. By reducing the length of the wire you reduce the resistance, increasing the current and the temperature of the wire. Place the wire between a piece of denim and adjust the length of wire until the denim is warm but not hot enough to burn or discolour.
The easiest way to do this is to string out the length of resistance wire between two supports and to move a pair of Alligator clips (connected to the power supply) along the wire until it gets to a suitable temperature. This is the total length of wire to be connected to the power supply in all the warmers. If the length is short (less than 20 inches) you will probably need to use a pair or more wired in parallel in each rear and one or more in each front. If it is longer (about 3 feet) you will probably want to use one length in each rear and one half the length in each of the front warmers and then wire the front warmers in series (giving the full total length).
The next step is to cut out the pieces of denim and Velcro. The size of the pieces of denim should be the circumference of a new (unworn) tyre plus 2 1/2 inches long by twice the width of the tyre plus half an inch wide for both the front and the rear. The four pairs of Velcro should be the width of the tyre wide by 2 1/2 inches long. (Mine denim pieces are all 12 inches long and 5 inches wide for the rear and 3 1/2 inches wide for the front.)
Now you can sew the resistance wire into position, first mark the centre line on the denim (lengthways) and sew the wire into position using a zigzag stitch. Mine were sewn as shown in the diagram but this will depend on the length of wire you use. Keep the wire at least 1/4 of an inch away from the sides and the centre line and all the ends of the wire 3 inches from one end. The power wires can then be soldered on and sewn into position.
The circuit should be tested before finishing the sewing, first make sure all the paths from positive to negative all go through the same length of resistance wire as calculated above, once this is done connect the power supply, leave it connected for about 10 minutes and make sure it does not get too hot, if it does extend the length of the resistance wire. If this works ok sew the Velcro into position (on the other side of the denim to the wire), fold the denim in half and sew around the edge to totally enclose the wire.
Make sure the wire is held firmly in place inside the denim with the zigzag stitch before sewing around the edge. Then sew through both layers of denim between the resistance wires using a strait stitch. This makes sure they can not touch each other, as they are not insulated. If they did touch it would cause the temperature to increase greatly and may cause a fire.
Now simply add the power plugs and your ready to get cookin'...